Showing posts with label Azure. Show all posts

Saturday, February 17, 2018

Zero downtime Azure App Service deployments with EF6 Code First Migrations and MVC5

This post is about how we deploy our production web sites to an Azure Web App Service and execute Entity Framework 6 code first migrations as part of a VSTS Release process.


A little bit of history:

What we were doing was running dbMigrator.Update() on the start of the website.

So in Startup.cs we had this:

var efConfiguration = new Configuration();

var dbMigrator = new System.Data.Entity.Migrations.DbMigrator(efConfiguration);

dbMigrator.Update();

This worked well, it upgraded the database, and applied any seed data. The downside was the site became unusable until all this had finished which for us was about 1 minute.

This also had a major downside when we turned on Azure auto scaling on the App Plan, when it scaled to more than 1 instance, all instances started up, and all of them called dbMigrator.Update(). Resulting in a fair number of exceptions and the site failing to start.


What we now do:

We needed to remove the database logic from Startup.cs and do it as part of the VSTS Release process instead. So we deploy the site to a staging slot, execute database migrations via Migrate.exe into the production database (on the build server), and then swap the staging slot to production.

This does mean the production web site code is running against a newer database schema until the site swaps over, but this is fine as long as the developers code to handle current and current-1 database versions.  This is how production now looks, sharing the same database.

clip_image002

How to implement this:

1. The build Process

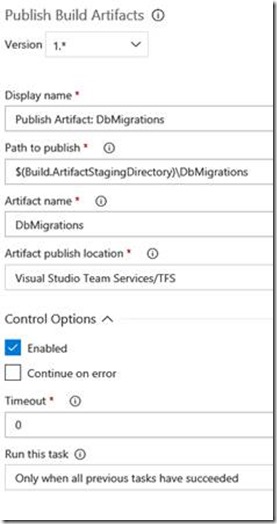
As well as packaging up the website into its own Artifact we now package up as another Artifact all the files we need in order to run migrate.exe, so we have 2 extra build tasks as part of our Main branch build:
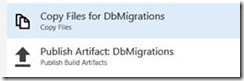
clip_image004

clip_image006

clip_image008

In the contents section:

line 1 : Copies our dll’s containing our entity framework migrations

line 2: Copies the DeployDatabase.ps1 PowerShell script below

line 3: Copies the migrate.exe provided by Entity Framework in the packages folder.

The DeployDatabase.ps1 PowerShell file contains:

#

# DeployDatabase.ps1

#

[CmdletBinding()]

Param(

[Parameter(Mandatory=$True,Position=1)]

[string]$webAppName,

[Parameter(Mandatory=$False,Position=2)]

[string]$slotName,

[Parameter(Mandatory=$False,Position=3)]

[string]$slotResourceGroup

)

cls

$ErrorActionPreference = "Stop" # Stop as soon as an error occurs

if($slotName -ne $null -and $slotName -ne '') {

$isSlot = $True

}

else {

$isSlot = $False

}

Write-Host "PSScriptRoot : " $PSScriptRoot

Write-host "Web app: " $webAppName

Write-Host "Using slot: " $isSlot " " $slotName

Write-Host "SlotResourceGroup: " $slotResourceGroup

$dll = "SiteDataAccess.Extended.Customer.dll"

Write-Host "Using dll: " $dll

if($isSlot) {

$GetWebSite = Get-AzureRmWebAppSlot -Name $webAppName -Slot $slotName -ResourceGroupName $slotResourceGroup

}

else {

$GetWebSite = Get-AzureRmWebApp -Name $webAppName

}

$Connection = $GetWebSite.SiteConfig.ConnectionStrings | Where {$_.name -eq "ExtendedSiteDBContext"}

$ConnectionString = $Connection.ConnectionString

Write-host "Executing Database migrations and seeding with Migrate.exe"

& "$PSScriptRoot\migrate.exe" $dll /connectionString=$ConnectionString /connectionProviderName="System.Data.SqlClient" /verbose

if ($LastExitCode -ne 0) {

throw 'migrate.exe returned a non-zero exit code...'

}

Write-host "Finished executing Database migrations and seeding with Migrate.exe"

Write-host "Finished"

What that script does when called from an Azure Powershell task in a Release definition is lookup the connectionString from the web app service in Azure and then uses that to call migrate.exe. We did this so we did not have to store any connectionStrings in VSTS. If the sql user in the connectionString used when executing migrate.exe needs different permissions to that of the website you could change this to use VSTS release variables instead.


2. The Release definition

When we release a site our process is:

· Stop the deployment slot ‘stage’

· Deploy the website zip to slot ‘stage’

· Update the database using the PowerShell script

· Start the Stage site

· Swap Stage with production

· Ping production site

· Stop the stage site (to save resources)


Our release definition looks like this:

Release definition

Task Groups

clip_image010

clip_image012

clip_image014

The Update Database task is just an Azure PowerShell task containing:

clip_image016

In Azure the App Service Plan is configured so that the production site and the stage slot are almost identical (baring a few appSetting values). They share the same connectionString and every appSetting and ConnectionString value has the ‘Slot Setting’ checkbox ticked.


Our big gotcha

Was during the swap slots task the website will be warm started automatically by that process hitting localhost under http, or it will try the domain name of the site but again under http. We had this in our filter.config

// Ensure all http connections are redirected to https

filters.Add(new RequireHttpsAttribute());


Which meant the warm start process instantly failed to start the site, the swap process continued and the site then started up from cold in production. We could see that because our ping task that pinged the production site, was taking a minute to respond.

What we had to do was create a custom version of the RequireHttpsattribute, once we did this our ping task responds in 1-3 seconds:

// Ensure all http connections are redirected to https

filters.Add(new CustomRequireHttpsAttribute());


And the code for the attribute is:

[AttributeUsage(AttributeTargets.Class | AttributeTargets.Method, Inherited = true, AllowMultiple = false)]

public class CustomRequireHttpsAttribute : RequireHttpsAttribute

{

    protected override void HandleNonHttpsRequest(AuthorizationContext filterContext)

{

    string ipAddress = filterContext.RequestContext.HttpContext.Request.UserHostAddress;

    var userAgent = filterContext.RequestContext.HttpContext.Request.UserAgent.ToLower();

    // 0.0.0.0 and 127.0.0.1 and ::1 are used by the Azure App Service Swap Slot process to Warm up the site before swapping the slot to production

    if(ipAddress == "0.0.0.0" || ipAddress == "::1" || ipAddress == "127.0.0.1")

    //if(userAgent.Contains("sitewarmup")) // doesnt work

    {

        return;

    }

    base.HandleNonHttpsRequest(filterContext);

    }

}

Sunday, April 23, 2017

Setup Application Gateway & the Internal Front-End Load Balancer for an application

Setup Application Gateway & the Internal Front-End Load Balancer for an application

This post follows on from the one on creating a service fabric environment in Azure http://jonlanceley.blogspot.co.uk/2017/04/3-node-service-fabric-environment-with.html

After you have deployed an application to service fabric you need to add the port for it to the service fabric cluster Front End load balancer and then to the Application Gateway.

1. Front End load balancer

The port is the one you have defined in your serviceManifest.xml e.g.

<Resources>

<Endpoints>

<Endpoint Protocol="http" Name="ServiceEndpoint" Type="Input" Port="8702" />

</Endpoints>

</Resources>

</ServiceManifest>

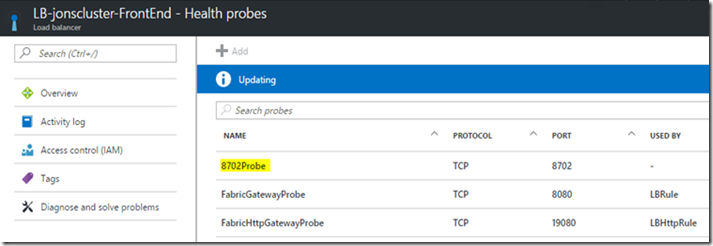
Create a new Health Probe

e.g. 8702Probe

image

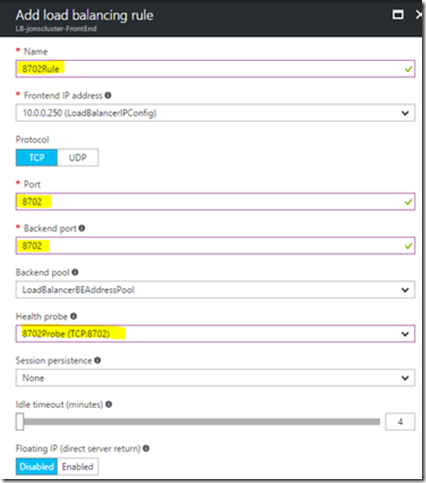
Create a new Load balancing rule

e.g. 8702Rule, make sure you set the highlighted items correctly.

image

image


2. Application Gateway

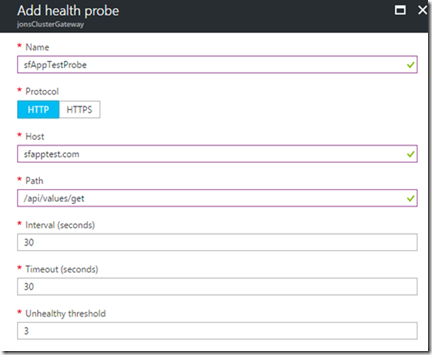
Add a new Health Probe

image

The path just needs to be an endpoint which can return a response so the health probe knows if the application is alive.

image


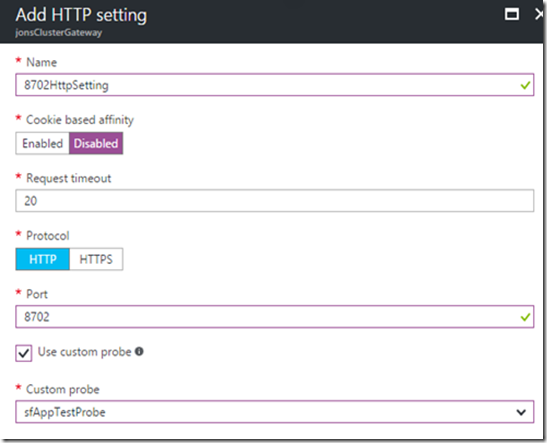
Add a new Http Setting

image

image


Add a new Mult-Site Listener

image

image


Add a new Basic rule

Make sure you choose the httpSetting you created earlier

image

image

Remove rule1 for the appGatewayHttpListener

image


Check the backend health

Before connecting via a browser it’s worth checking that the Backend health report is Healthy otherwise you have missed something.

image

If it’s healthy, try opening your application in a browser e.g.

http://sfapptest.com/api/values/get

Wednesday, April 19, 2017

3 Node Service Fabric Environment with an Azure Application Gateway

This is an article I put together as I was experimenting with Service Fabric for a real world solution to a problem we had. 

In it we will create a service fabric environment in Azure which contains 3 node types, FrontEnd, BackEnd, and Management, plus an Application Gateway in front which all internet traffic can be routed through to the FrontEnd node. We will also be using an existing Virtual Network and Subnets that we will put the service fabric cluster into.

This post helped me a lot with producing this solution:

https://brentdacodemonkey.wordpress.com/2016/08/01/network-isolationsecurity-with-azure-service-fabric/

My template originally came from the Azure Portal when creating a new service fabric cluster there is the option of saving it as a template. It was then customised as the portal wizard does not let you do certain things. Most of the customisations came from this site:

https://docs.microsoft.com/en-us/azure/service-fabric/service-fabric-patterns-networking

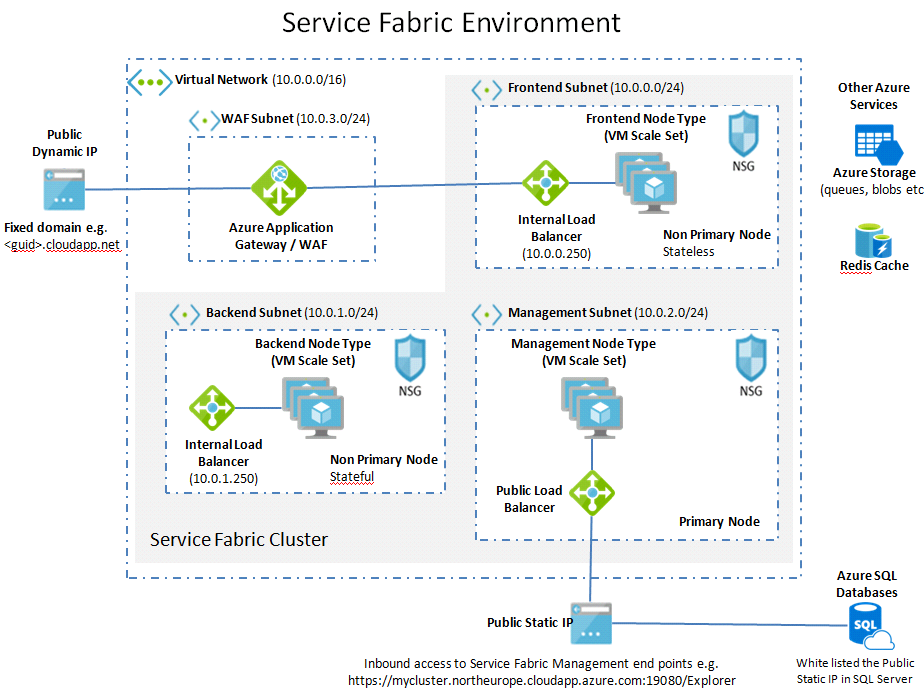
This is what we will build:

The FrontEnd node type is where we put any stateless services.

The BackEnd node type is where we would put any stateful services.

The Azure service fabric services will run on the Management / Primary node type.

· This has a public static outbound IP number, so we can connect to view the status of the cluster.

· It can also host services which need to connect out to a third party which have IP security on their firewall. The third party then only needs to add this IP number to their firewall.

· We can also use this to securely access an Azure SQL database that has IP restricted access.


The steps below are my notes for creating the service fabric environment.  All the scripts and ARM template are available on Github:

https://github.com/jonlanceley/jonlanceley/tree/master/CreateServiceFabricEnvironment

1. Create Service Fabric dependencies.

· Public Static IP (for Management nodeType)

· Key Vault (for service fabric certificates)

· Active Directory Application (for authentication)

· Resource Group to put service fabric cluster in

· Existing Virtual Network with 4 subnets for:

    o FrontEnd

    o BackEnd

    o Management

    o WAF / Application Gateway

Edit & change the parameters as required in this script:

Azure-CreateDependanciesForServiceFabricPlatform.ps1

Execute the script

Note: this script will prompt you yes/no to create each of the above items.

If you’re creating a non-development version we do not want to use a self-signed certificate so say ‘no’ when prompted. After the script has run you then need to manually add certificates into the key vault. Details here:

https://docs.microsoft.com/en-us/azure/service-fabric/service-fabric-cluster-creation-via-portal#add-certificates-to-key-vault

https://blogs.technet.microsoft.com/kv/2016/09/26/get-started-with-azure-key-vault-certificates/


2.
Create the Service Fabric Environment

This will create a 3 nodeType service fabric environment FrontEnd, Backend and Management nodeTypes.

The management node type is set as the Primary.

Note the NSG’s are not assigned to the Subnet but they are created by the script.

Go to folder:

secureTemplateAnd3NodeTypeWithApplicationGatewayAndExistingSubnet

Copy the parameters.json file and then change the parameters.

Note: By default the script creates the minimum number of VM’s all at Standard A0 size. If this is a non-development environment you will want to change the VM size to be:

    · Minimum number of instances:

        o Set to 5 on Management/Primary node type

        o Set to 5 on Backend node type (stateful)

        o Set to 2 on Frontend node type (stateless)

    · Size (set to Standard D1_V2 the minimum supported spec for all node types)

    · Reliability Level of the cluster should be minimum of Silver in production (default is Bronze)

o Static IP parameters (change to match those you just setup):

    • existingStaticIPResourceGroup
    • existingStaticIPName
    • existingStaticIPDnsFQDN

o Specifiy the existing Virtual network and subnet names:

    • virtualNetworkName
    • existingVNetRGName
    • subnet0Name
    • subnet1Name
    • subnet2Name
    • subnetWAFName

o Active Directory parameters (change to match those you just setup):

    • aadTenantId
    • aadClusterApplicationId
    • aadClientApplicationId

o Certificate parameters (change to match those you just setup):

    • SourceVaultValue
    • certificateUrlValue
    • certificateThumbprint

o VM login parameters (used if you ever need to RDP into a cluster machine):

    • adminUserName
    • adminPassword

o Other parameters

Execute the deploy script:

.\deploy.ps1 -subscriptionId <yourAzureSubscriptionIdHere> -resourceGroupName mycluster -deploymentName mycluster -parametersFilePath .\parameters.json

If after a long time it errors with this message ‘Monitoring Agent not reporting success after launch’

image

Then you should be fine as Service Fabric will automatically recover the nodes that this failed for.


3. After deployment

Go to the Azure portal and find your service fabric cluster and you should eventually see the nodes (they may take some time to appear).

image

Once the deployment has finished and you can see in the Azure Portal that the nodes in the cluster are running you should be able to view the cluster e.g.

https://jonscluster.northeurope.cloudapp.azure.com:19080/Explorer

This should prompt you to login. If you see a message:

AADSTS50105: The signed in user 'jon.lanceley_xxxxxxxxx.com#EXT#@jonlanceleyxxxxxxxx.onmicrosoft.com' is not assigned to a role for the application '9df93f43-6682-4004-addd-1522a4e13439'.

Go to Azure Active Directory -> Enterprise Applications -> All Applications

image

Find the cluster server application (not the client one)

Add the user as an Admin

image

That’s it, you should now have a running Service Fabric Cluster. 

You now just need to deploy some code to it.  And then open the Front End Internal load balancer and the Application Gateway ports for the application: http://jonlanceley.blogspot.co.uk/2017/04/setup-application-gateway-internal.html