Showing posts with label Asp.Net MVC5. Show all posts

Saturday, February 17, 2018

Zero downtime Azure App Service deployments with EF6 Code First Migrations and MVC5

This post is about how we deploy our production web sites to an Azure Web App Service and execute Entity Framework 6 code first migrations as part of a VSTS Release process.


A little bit of history:

What we were doing was running dbMigrator.Update() on the start of the website.

So in Startup.cs we had this:

var efConfiguration = new Configuration();

var dbMigrator = new System.Data.Entity.Migrations.DbMigrator(efConfiguration);

dbMigrator.Update();

This worked well, it upgraded the database, and applied any seed data. The downside was the site became unusable until all this had finished which for us was about 1 minute.

This also had a major downside when we turned on Azure auto scaling on the App Plan, when it scaled to more than 1 instance, all instances started up, and all of them called dbMigrator.Update(). Resulting in a fair number of exceptions and the site failing to start.


What we now do:

We needed to remove the database logic from Startup.cs and do it as part of the VSTS Release process instead. So we deploy the site to a staging slot, execute database migrations via Migrate.exe into the production database (on the build server), and then swap the staging slot to production.

This does mean the production web site code is running against a newer database schema until the site swaps over, but this is fine as long as the developers code to handle current and current-1 database versions.  This is how production now looks, sharing the same database.

clip_image002

How to implement this:

1. The build Process

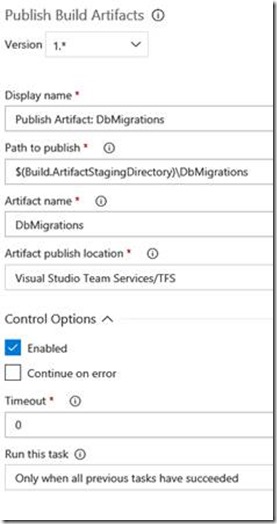
As well as packaging up the website into its own Artifact we now package up as another Artifact all the files we need in order to run migrate.exe, so we have 2 extra build tasks as part of our Main branch build:
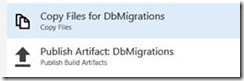
clip_image004

clip_image006

clip_image008

In the contents section:

line 1 : Copies our dll’s containing our entity framework migrations

line 2: Copies the DeployDatabase.ps1 PowerShell script below

line 3: Copies the migrate.exe provided by Entity Framework in the packages folder.

The DeployDatabase.ps1 PowerShell file contains:

#

# DeployDatabase.ps1

#

[CmdletBinding()]

Param(

[Parameter(Mandatory=$True,Position=1)]

[string]$webAppName,

[Parameter(Mandatory=$False,Position=2)]

[string]$slotName,

[Parameter(Mandatory=$False,Position=3)]

[string]$slotResourceGroup

)

cls

$ErrorActionPreference = "Stop" # Stop as soon as an error occurs

if($slotName -ne $null -and $slotName -ne '') {

$isSlot = $True

}

else {

$isSlot = $False

}

Write-Host "PSScriptRoot : " $PSScriptRoot

Write-host "Web app: " $webAppName

Write-Host "Using slot: " $isSlot " " $slotName

Write-Host "SlotResourceGroup: " $slotResourceGroup

$dll = "SiteDataAccess.Extended.Customer.dll"

Write-Host "Using dll: " $dll

if($isSlot) {

$GetWebSite = Get-AzureRmWebAppSlot -Name $webAppName -Slot $slotName -ResourceGroupName $slotResourceGroup

}

else {

$GetWebSite = Get-AzureRmWebApp -Name $webAppName

}

$Connection = $GetWebSite.SiteConfig.ConnectionStrings | Where {$_.name -eq "ExtendedSiteDBContext"}

$ConnectionString = $Connection.ConnectionString

Write-host "Executing Database migrations and seeding with Migrate.exe"

& "$PSScriptRoot\migrate.exe" $dll /connectionString=$ConnectionString /connectionProviderName="System.Data.SqlClient" /verbose

if ($LastExitCode -ne 0) {

throw 'migrate.exe returned a non-zero exit code...'

}

Write-host "Finished executing Database migrations and seeding with Migrate.exe"

Write-host "Finished"

What that script does when called from an Azure Powershell task in a Release definition is lookup the connectionString from the web app service in Azure and then uses that to call migrate.exe. We did this so we did not have to store any connectionStrings in VSTS. If the sql user in the connectionString used when executing migrate.exe needs different permissions to that of the website you could change this to use VSTS release variables instead.


2. The Release definition

When we release a site our process is:

· Stop the deployment slot ‘stage’

· Deploy the website zip to slot ‘stage’

· Update the database using the PowerShell script

· Start the Stage site

· Swap Stage with production

· Ping production site

· Stop the stage site (to save resources)


Our release definition looks like this:

Release definition

Task Groups

clip_image010

clip_image012

clip_image014

The Update Database task is just an Azure PowerShell task containing:

clip_image016

In Azure the App Service Plan is configured so that the production site and the stage slot are almost identical (baring a few appSetting values). They share the same connectionString and every appSetting and ConnectionString value has the ‘Slot Setting’ checkbox ticked.


Our big gotcha

Was during the swap slots task the website will be warm started automatically by that process hitting localhost under http, or it will try the domain name of the site but again under http. We had this in our filter.config

// Ensure all http connections are redirected to https

filters.Add(new RequireHttpsAttribute());


Which meant the warm start process instantly failed to start the site, the swap process continued and the site then started up from cold in production. We could see that because our ping task that pinged the production site, was taking a minute to respond.

What we had to do was create a custom version of the RequireHttpsattribute, once we did this our ping task responds in 1-3 seconds:

// Ensure all http connections are redirected to https

filters.Add(new CustomRequireHttpsAttribute());


And the code for the attribute is:

[AttributeUsage(AttributeTargets.Class | AttributeTargets.Method, Inherited = true, AllowMultiple = false)]

public class CustomRequireHttpsAttribute : RequireHttpsAttribute

{

    protected override void HandleNonHttpsRequest(AuthorizationContext filterContext)

{

    string ipAddress = filterContext.RequestContext.HttpContext.Request.UserHostAddress;

    var userAgent = filterContext.RequestContext.HttpContext.Request.UserAgent.ToLower();

    // 0.0.0.0 and 127.0.0.1 and ::1 are used by the Azure App Service Swap Slot process to Warm up the site before swapping the slot to production

    if(ipAddress == "0.0.0.0" || ipAddress == "::1" || ipAddress == "127.0.0.1")

    //if(userAgent.Contains("sitewarmup")) // doesnt work

    {

        return;

    }

    base.HandleNonHttpsRequest(filterContext);

    }

}

Tuesday, April 12, 2016

Release Management in TFS 2015.2

With the TFS 2015.2 update we now have the ability to use Release Manager in TFS on premise. This is how I have setup our branching structure, gated check-in and release manager to control the deployment (with approvals at some stages) of an MVC5 web site with Entity Framework into multiple Azure Web Application environments.

We have our branching structure set as:

Dev\developer name 1

Dev\developer name 2 etc

Main

Developers take a branch from main into the dev folder under their name and work on changes. When development is complete they check-in to their dev branch and then merge the changes into the Main branch. This allows the developer to pull in other changes from main into their dev branch, and be able to check-in at least daily into their dev branch so their code is backed up overnight.

We are using the new TFS build tasks; and setup against the Main branch is:

  • A gated check-in.

image001_thumb7_thumb

  • And a number of build tasks that compile the code in Release mode, run some unit tests and finally copy the files/build artifacts we need to deploy the web site into the drop folder (essentially a web deploy zip file is created).

image002_thumb2_thumb


The key to creating a web deploy zip file is the MS Build Arguments:

/p:DeployOnBuild=true /p:WebPublishMethod=Package /p:PackageAsSingleFile=true /p:SkipInvalidConfigurations=true

In the copy and Publish build artifacts task we have:

image003_thumb1_thumb

This automatically builds all changes checked into the Main branch with the final step it produces the web deploy files. Assuming the build passes then Release Manager will take over to deploy the web site into an Azure Web Application.

We have 4 environments in Azure that we need to deploy to ‘UAT Staging’, ‘UAT’, ‘Production Staging’ and ‘Production’. For us these are split into 2 Azure subscriptions, one for UAT one for Production. Within each subscription is 1 web application e.g. UAT and against that 1 slot ‘staging’ and each has its own Azure SQL database. This gives us 2 websites and 2 databases. We make use of sticky slot settings as well so the connection string / app settings stay against its environment because in production we make use of the Azure web application swap slot functionality.

So we configure release manager to deploy the code to UAT staging, UAT and Production staging. But for production release manager just initiates a swap slot PowerShell command.

So in Release manager we will need to setup the deployment process or tasks for each of these environments.

But first Release manager is setup to watch the main branch for a new build artifact which is done by setting the release trigger to Continuous Deployment.

image004_thumb1_thumb

As soon as a new version is checked in setting the UAT Staging environment trigger to ‘Automated after release creation’ will initiate a deployment into that environment automatically (and for us with no approvals required because that is the first server in Azure which our developers can test against).

On the environments tab we define the deployment steps for each environment so for UAT Staging we have:

  • Stop the Azure web application
  • Deploy the new code/web site
  • Start the Azure web application

image005_thumb1_thumb

We are making use of the new TFS Market Place extension ‘Run Inline Azure Powershell’ task which allows us to stop the Azure web application with:

Stop-AzureWebsite -Name $(WebAppName) -Slot stage

And below are the properties of the Azure Web App Deployment task, with the main one being the path to the Web Deploy Package.

Note: Our web applications are always running in Azure we are not creating them on demand.

image006_thumb2_thumb

The UAT and Production Staging environments all have the same 3 tasks. Deployment into an environment takes about 1 minute 20 seconds.

The Production environment has 1 task which swaps Production Staging with Production by executing this powershell script:

Switch-AzureWebsiteSlot -Name $(WebAppName) -Slot1 stage -Slot2 production -Force -Verbose

image007_thumb2_thumb

That allows us to do a quick production deployment (saving us that 1 minute 20).

UAT, Production Staging and Production all have Pre-Deployment approvers setup.

image008_thumb1_thumb

So deployment to the 1st Azure environment ‘UAT Staging’ happens automatically upon a successful check-in to the Main branch.

The developer has the chance now to manually test the site. When they want to deploy to the next environment ‘UAT’ they would open the release in release manager and start the deployment:

image009_thumb1_thumb

image010_thumb1_thumb

By using the ‘Deploy’ button to request the code is deployed into the UAT environment this will send an email to the approvers who will ‘hopefully’ approve the release and if they do release manager will execute the 3 deployment tasks setup for the UAT environment.

The same process would be followed for the remaining environments, the developer tests then uses the deploy button to move the same web application code to the next environment.

At any point we can check what release is in what environment by looking at the overview tab.

image011_thumb2_thumb

Database changes are done via Entity Framework Code First Migrations which are executed upon web site start up by running this code added to the MVC site startup.cs class:

var efConfiguration = new Configuration();

var dbMigrator = new System.Data.Entity.Migrations.DbMigrator(efConfiguration);

dbMigrator.Update();

This will execute any schema changes and then run the seed data method. The key to keeping the seed data updated is using the extension method ‘AddOrUpdate’.


Useful Links

https://msdn.microsoft.com/library/vs/alm/release/overview

Sunday, August 30, 2015

Unit Testing (part 2) - Faking the HttpContext and HttpContextBase

This is the 2nd in a series of posts about unit testing:

Unit Testing (part 1) - Without using a mocking framework

Unit Testing (part 2) - Faking the HttpContext and HttpContextBase

Unit Testing (part 3) - Running Unit Tests & Code Coverage

Unit Testing (part 4) - Faking Entity Framework code first DbContext & DbSet


There are a lot of posts on the internet about faking the http context.  And when we have controllers / service functions / MVC routes that all make use of the HttpContext how do you fake it. 

This is my approach which works consistently across all my tests.  I went down a route initially of having different ways of handling a HttpContext vs a HttpContextBase.  And then I found way to have 1 approach so the tests are consistent.


First we need a way to fake a normal HttpContext.

    public class FakeHttpContext

    {

        public HttpContext CreateFakeHttpContext()

        {

            var httpRequest = new HttpRequest("", "http://localhost/", "");

            var stringWriter = new StringWriter();

            var httpResponce = new HttpResponse(stringWriter);

            var httpContext = new HttpContext(httpRequest, httpResponce);

            var sessionContainer = new HttpSessionStateContainer("id",

new SessionStateItemCollection(),

new HttpStaticObjectsCollection(),

10,

true,                                                    HttpCookieMode.AutoDetect,                                                    SessionStateMode.InProc, false);

            SessionStateUtility.AddHttpSessionStateToContext(httpContext, sessionContainer);

            return httpContext;

        }

    }


Secondly we need a way to fake HttpContextBase. 

MVC already have this covered with their implementation of HttpContextWrapper.  But unfortunately even this doesn’t go quite far enough especially when you want to unit test MVC routes. But we can extend it, enter our FakeHttpContextWrapper.  This inherits from Microsoft’s HttpContextWrapper.

What this is going to do is allow us to create our own fake classes by extending the Microsoft ones (so we don’t have to reinvent the wheel).  And this will now let us over-ride the properties we need for unit testing.

We first create a FakeHttpContextWrapper which contains our FakeHttpRequestWrapper, and could also contain a FakeHttpResponseWrapper if we needed it. I’ve commented out the FakeHttpResponseWrapper as I didn’t need it but it does work if you uncomment it.

    public class FakeHttpContextWrapper : HttpContextWrapper

    {

        FakeHttpRequestWrapper _request;

        //FakeHttpResponseWrapper _response;


public FakeHttpContextWrapper(HttpContext httpContext)

            : base(httpContext)

        {

            _request = new FakeHttpRequestWrapper(httpContext.Request);

            //_response = new FakeHttpResponseWrapper(httpContext.Response);

        }


public FakeHttpContextWrapper(HttpContext httpContext, string appPath = "/",       

                            string requestUrl = "~/", string clientIP = null)

            : base(httpContext)

        {

            _request = new FakeHttpRequestWrapper(httpContext.Request, appPath, requestUrl, clientIP);

            //_response = new FakeHttpResponseWrapper(httpContext.Response);

        }


        /// <summary>

        /// Over-ridden so we can return our FakeHttpRequestWrapper class instead

        /// </summary>

        public override HttpRequestBase Request

        {

            get

            {

                return _request;

            }

        }


        public override HttpResponseBase Response

        {

            get

            {

                //return _response;

                return base.Response;

            }

        }

    }

We then create a FakeHttpRequestWrapper which inherits from the Microsoft HttpRequestWrapper.  This is where the magic happens as this allows us to over-ride those getter properties ApplicationPath, AppRelativeCurrentExecutionFilePath and UserHostAddress so we can implement our own logic.

    /// <summary>

    /// This class allows us to set additional properties that are anoyingly null by

    /// default if you just used the HttpRequestWrapper class alone.

    /// We are over-ridding the ApplicationPath & AppRelativeCurrentExecutionFilePath

    /// as these are needed to unit test MVC routes

    /// </summary>

    public class FakeHttpRequestWrapper : HttpRequestWrapper

    {

        string appPath;

        string requestUrl;

        string clientIP;


        public FakeHttpRequestWrapper(HttpRequest httpRequest)

            : base(httpRequest)

        {

        }


        public FakeHttpRequestWrapper(HttpRequest httpRequest, string appPath = "/",

                                    string requestUrl = "~/", string clientIP = null)

            : base(httpRequest)

        {

            this.appPath = appPath;

            this.requestUrl = requestUrl;

            this.clientIP = clientIP;

        }


        public override string ApplicationPath

        {

            get

            {

                return appPath;

            }

        }


        public override string AppRelativeCurrentExecutionFilePath

        {

            get

            {

                return requestUrl;

            }

        }


        public override string UserHostAddress

        {

            get

            {

                return clientIP;

            }

        }

    }

I didn’t need to fake the response but this is how you’d do it if you need to:

    public class FakeHttpResponseWrapper : HttpResponseWrapper

    {

        public FakeHttpResponseWrapper(HttpResponse httpResponse)

            : base(httpResponse)

        {

        }

    }

In this unit test you can see 2 lines that deal with setting the HttpContext. 

[TestMethod]

public void ProductService_PopulateModel_IPDetectUSA()

{

  var clientIP = "1.1.1.2";

  var productService = unityContainer.Resolve<IProductService>();

  HttpContext.Current = new FakeHttpContext().CreateFakeHttpContext();


  var httpContextWrapper = new FakeHttpContextWrapper(httpContext:     

                                        HttpContext.Current,

                                        clientIP: clientIP);

  var model = productService.PopulateModel(httpContextWrapper);

}

The 1st line sets a normal HttpContext.Current using our FakeHttpContext () method. 

The 2nd line uses our FakeHttpContextWrapper method to wrap and extend the HttpContext.Current we set up on the 1st line which is something we can now pass to MVC controllers or routes.


And this is how you’d unit test an MVC route (the clientIP and requestUrl parameters are optional).

[TestMethod]

public void Route_Account_Login()

{

  var routes = new RouteCollection();

  RouteConfig.RegisterRoutes(routes);

   HttpContext.Current = new FakeHttpContext().CreateFakeHttpContext();

   var httpContextWrapper = new FakeHttpContextWrapper(httpContext:

       HttpContext.Current,

requestUrl: "~/account/login/");

   var routeData = routes.GetRouteData(httpContextWrapper);


   //Expected Results

   AssertAll.Execute(() => Assert.IsNotNull(routeData),

   () => Assert.AreEqual("Account", (string)routeData.Values["controller"], true),

   () => Assert.AreEqual("login", (string)routeData.Values["action"], true),

   () => Assert.IsTrue(string.IsNullOrWhiteSpace(routeData.Values["id"].ToString())));

}


And this is how you would test an MVC controller, using the same 2 lines in yellow just without the optional parameter this time.

[TestMethod]

public void ProductController_CheckView()

{

   var productService = unityContainer.Resolve<IProductService>();

   var productController = new ProductController(productService);

   HttpContext.Current = new FakeHttpContext().CreateFakeHttpContext();

   var httpContextWrapper = new FakeHttpContextWrapper(httpContext:

HttpContext.Current);

  // Pass the fake httpContext to the controller context

  productController.ControllerContext = new ControllerContext(httpContextWrapper, new

RouteData(), productController);


  // Call the controller method to test

  var controllerResult = productController.Index();


  // Check the view name is correct

  Assert.IsTrue(controllerResult is ViewResult, "ViewResult");

  var view = controllerResult as ViewResult;

  Assert.AreEqual("Index", view.ViewName, "ViewName");

}